This is the fourth installment in a series by corrugated equipment specialist Jim Brown. Articles will outline what the board experiences during the conversion process, but from an unusual perspective: that of the board itself, in the form of our imaginary narrator, Corra Gator-Boardy.
Ride along with Corra in a series of six mini-adventures on her way from a flat corrugated board to an amazing, corrugated container.
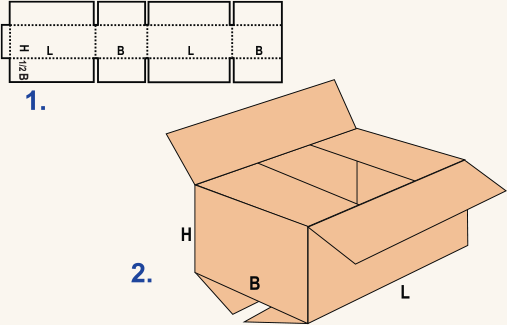
When we left Corra last, she was exiting the die cutter section. So far, she had been fed through the feed section, was printed on several times in various colors, and die cut. Now she was off to the creaser/slotter section. This will prove to be a very transformative step in her conversion, as it will create her separate panels by cutting slots in her lead and trail edges in board-travel direction, and form creases to allow her panels to be folded up into a three-dimensional box. Her glue tab will also be formed by creating a lead and trail slot, cutting off the tab scrap, and crushing the flute in the tab area.

The creasing and slotting heads are attached to upper and lower shafts that create the creasing and slotting nips
Corra remembered receiving her corrugator creases (her long, horizontal creases) as she rolled off the corrugator. But now she would be receiving creases and slots in the board-travel direction from a series of creasing and slotting heads. These heads are fitted with knives and creasing profiles called tooling.
First, Corra passes through the creasing nip, which consists of a set of creasing heads mounted onto a pair of upper and lower creasing shafts. These heads can be adjusted across the machine’s width in various positions to make various panel sizes. They consist of a “male” creaser profile ring and a “female” This is the fourth installment in a series by corrugated equipment specialist Jim Brown. Articles will outline what the board experiences during the conversion process, but from an unusual perspective: that of the board itself, in the form of our imaginary narrator, Corra Gator-Boardy. Ride along with Corra in a series of six mini-adventures on her way from a flat corrugated board to an amazing, corrugated container. anvil, both of which are usually split to allow for easy replacement. Now Corra has her folding creases.

Next, she travels through a pull roll nip, which consists of a set of pull collars (similar to heads) on one shaft, which allows the machine to support smaller boxes when travelling between the large creaser and slotter heads. These pull collars are also adjustable across the width of the machine to accommodate various board sizes. Their whole purpose is simply to transport Corra safely between the creaser nip and slotter nip without falling into the machine.
Finally, Corra passes through the slotter nip, which consists of a set of slotting heads, also mounted on upper and lower shafts. The upper slotter heads have sharp knife segments, called male slotter knives, bolted to an internal adjustable ring. The lower slotter heads have two annular rings, called female knives, separated by a spacer that is the width of the upper knife. The edges of the lower knives are also sharp. As the slotter shafts rotate, the male knives pierce through Corra’s panels and rip slots to her outer edge as the male knives pass through the female knives like a rotary scissor. At the same moment, a pair of tab knife heads on the operator side clip off her glue tab ends.
On the drive side of the machine, a pair of slitter heads that hold sharp, annular knife rings trim her drive-side edge to size. Also, there is an electric register on the upper shaft that positions the male knife ring in the perfect place for Corra’s specific panels. This is called the slot depth setting.
On all these nips (creaser, pull roll, and slotter), one shaft is in a fixed bore and the other shaft is adjustable in an eccentric housing, allowing for the nip to be opened and closed. The shaft with the register is always the fixed bore shaft. As with her other experiences in the machine, these nips are set to hold and stabilize Corra without crushing her flute. At last, she is completely printed, creased, and slotted. She will be leaving the box machine press and on her way to her next adventure! In the next issue of Paper360°, share Corra’s final adventures as she passes through the folder/gluer and counter/ejector sections and is made ready for shipment to the customer.
 Paper 360

